Create Invoice
To create a new invoice from the Partner Portal, navigate to the invoices page in the Partner dashboard, and click on the New invoice button in the top right.


Here you can add all the details related to the invoice and policy. A Simfuni invoice can contain one or more policies. All fields are mandatory, and the following information is required:
Invoice number - A reference for the invoice. This could be used to match up an invoice with a number in any workflow software.
Due date - When the invoice has to be paid by
Billed to - Who will be paying for the invoice. This can be a new or existing client
Policy number - A reference for the policy. This could be used to match up a policy with a number in any workflow software.
Policy provider - The insurer who will provide the insurance
Class code - The class code for the policy. Note, some class codes do not allow premium financing
Premium - The cost of premium
Start date - The beginning date of the loan for the policy
End date - The end date of the loan for the policy
Multiple policies can be added by using the plus icon  .
.
Note, if the policyholder is using premium financing, and multiple policies have different start and end dates, there are some additional considerations. See Adding Multiple Policies to One Invoice.
Saving and sending the invoice to the policyholder
Once you have finished entering all the details, simply click on the "Save Invoice" button located at the bottom right corner of the page ![]() .
.
This action will save all the information you have entered into the Simfuni platform.
After saving, you will be directed to the invoice page where you can view a summary of the invoice, along with any additional information such as customer payment options, if applicable.

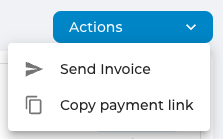
Once you have confirmed that all the details are correct, you can proceed by clicking on the actions dropdown menu located at the top right corner.
From here, you have two options. You can either send the invoice directly to the policyholders email address or copy the payment link if you prefer to send it yourself.

Once the client has made the payment, you can easily track the status of the invoice on this page. The Payment summary shows the status of the client's payments and when the policy is paid until.

Scheduled first payment
Customers can choose on their own to schedule their initial payment during the payment process, provided that no policy coverage has commenced.
If a customer completes the checkout process on or after the initial coverage start date, the first payment must be made on the same day.
For clients who have elected to defer their initial payment to a later date in the payment process, it will be reflected in the Partner Portal invoice as Scheduled. After the initial payment has been processed, the Payment summary will show that payments are up to date.


To learn more about invoice statues, visit our Managing Invoices page.